This is the first part of my 2 section tutorial on setting up a blogger blog on custom domain. In this part I have discussed how to set up A records and CNAME records for the custom domain to use it for your blogspot blog according to the newly updated features and settings by Blogger.
After buying a custom domain
for your blog, the next step is to set up CNAME and A records for it.
Recently (in October 2012) Blogger had faced some issues regarding
mapping a custom domain for its blogspot users and after that, they had
introduced a new CNAME record to verify the ownership of domain.
OK. So let us move on to these settings. I have divided the
settings in 2 parts. The first part is divided into two parts according
to your registrant. That is because in Godaddy, these settings are
easier compared to other registrants. The second part deals with the 2nd
CNAME record required as per latest update by Blogger.
Part 1: Setting A records and 1st required CNAME record
Option 1: For domains registered through Godaddy:
Go to your account domain setting tool and
enter the domain name you want to set up for blogger as shown in the
figure below. In 10-15 minutes, the account will be half ready for
blogger.

I said half ready because still there is one more CNAME record remaining to add. Now jump to Part 2.
Option 2: For domains registered through Namecheap, name.com or other registrants:
For other registrants, you will have to manually set up A records and CNAME records.
These are the required A records:
@ 216.239.32.21 1800
@ 216.239.34.21 1800
@ 216.239.36.21 1800
@ 216.239.38.21 1800
Here 1800 is the TTL (Time to live)
And this is the 1st CNAME record you need to enter:
www ghs.google.com
Now move to Part 2 to create the 2nd required CNAME record
Part 2: Setting 2nd required CNAME record
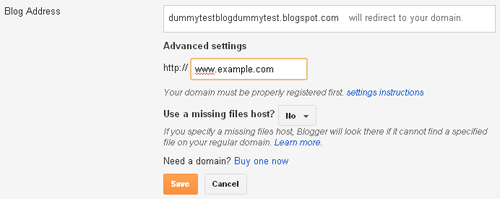
Go to: Blogger Dashboard > Settings > Basic > Blog Address > Add a custom domain
Now click on ‘Switch to advanced settings’.
Enter your domain name with www like www.example.com (as shown above). Now click on settings instructions.
You will be taken to a page of instructions. First select ‘On a
top-level domain (www.example.com)’ option. Now find the second CNAME
record details and note it.

Now open your registrant and go to account domain settings and
manually enter the 2nd CNAME record as given in the instructions page.
Note that in some registrants like Godaddy there is no need to (and you
cannot) add the last dot (.) given in the CNAME destination eg “xyzabc.domainverify.googlehosted.com.” There is no need to add the last dot so just type “xyzabc.domainverify.googlehosted.com” in the CNAME destination.
Congrats! You have completed the required tasks to set up a custom
domain for blogger. Now wait for nearly one hour for the settings to
show their results and then move to the next step of setting up blogger
on custom domain.


0 Comments